Ceramics
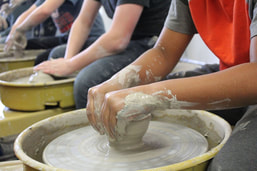
This course introduces various hand-building techniques in ceramics construction as well as surface treatments. Students will learn to build using pinching, coils, slabs, and ribbons. Students will also have the opportunity to try wheel-throwing.
|
Syllabus
|
December 9-13
Monday-Students should be underglazing their final projects as well as glazing or cold decorating their Beautiful, Yet Functional project. I will be grading their salt and pepper shakers and students will be able to take those home. Tuesday-Students will continue to glaze their Beautiful yet Functional pieces as well as begin to cold decorate their trompe l'oeil sculptures. Wednesday-Students should continue to glaze and cold decorate projects. Thursday-Students will have the opportunity to work on their short research paper on the piece they used as inspiration for their final project. They should also be glazing any remaining projects. Friday- We will have our studio clean up day. Students will be cleaning and organizing tools. I will also hand out the final exam study guide so students can begin to work on it. December 2-6
Monday-Students will begin their final project. They will be recreating a historic work of pottery or sculpture. Tuesday-Thursday- Students will continue to work on their final project until it is done. They will need to begin the underglaze process if they plan to do so. Friday-Students will complete their final project and put it in the kiln room to begin drying out. November 18-22
Monday- Wednesday- Students will continue to work on their trompe l'oeil sculptures. They also need to be sure they have glazed their sculptural bowl to be out of the glaze firing for critique on Friday. Thursday- I will introduce students to their final project. Students will be introduced to various cultures that created ceramic art. We will then be in the media center so that students can research an artwork they want to recreate. They must pick a piece from art history that is at least 100 years old. They will later research more about the piece and the culture. For now, they will sketch, plan on the best building method, and how they will go about decorating the outside afterward to make it look like the original piece. Friday-Students will complete their sketches for their final project. We will then have a critique of their sculptural bowls and have an ice cream party and eat ice cream out of their bowls. They also need to make sure any clay work is finished up before we leave for break. I hope everyone has a wonderful Thanksgiving celebrating with family and friends. Nov. 11-15
Monday- Students will continue to work on their Beautiful, yet Functional project. Their creation should solve a problem in their lives while still being aesthetically pleasing. Tuesday- Students will complete their Beautiful, yet Functional project and put it in the kiln room to begin drying out. Wednesday-I will introduce students to their next hand building project, trompe l'oeil. Students will create an everyday object out of clay that should look realistic from a short distance. Thursday-Students will continue to work on their trompe l'oeil sculptures. Friday-We will have our critique of salt and pepper shakers. Students will then continue to work on their trompe l'oeils. Nov. 4-8
Monday- Students will finish up their sculptural bowls. Tuesday-Teacher workday. Enjoy your day off! Wednesday- I will be introducing students to their next project, Beautiful yet Functional. Students will create a "product" that solves a problem in their life. They should make sure it is also aesthetically pleasing. Students will sketch an idea before they begin. Thursday- Students will begin constructing their Beautiful, yet Functional piece. Friday-Students will continue their Beautiful yet Functional piece. October 28-November 1
Monday-We are a behind and most students are still working on their salt and pepper shakers. Once they are done, they should glaze their ribbon pots. Tuesday-I will introduce students to their next project, sculptural bowls. Students who are done with everything else may begin to brainstorm and sketch. Wednesday-We will be returning from our field trip just in time for class. Students should be beginning their sculptural bowls. They can use any hand building process (pinching, coils, or ribbons) they want to create their bowl. Once their sketch is complete and approved, they may begin. Thursday-Students will continue to work on their sculptural bowls. Friday- Students will continue to work on their sculptural bowls. Once the bowl is built, they will need to begin to add their 3D sculptural elements. October 21-25
Monday- I introduced students to their salt and pepper shaker project on Friday. Students need to complete their sketch and have it approved before they can begin. Tuesday- Students will continue to work on their salt and pepper shakers. Wednesday-Students will continue to work on their salt and pepper shakers. Thursday- We will have our critique of luminaries. Students will then complete their salt and pepper shakers. Friday- I will introduce students to their next project, sculptural bowls. Students will brainstorm and sketch ideas. October 14-18
Monday- Students will continue to work on their ribbon pots. They should add 3-4 ribbons a day until they are a minimum of 8" for pitchers and 10" for vases. Tuesday- Students will continue to work on their ribbon pots. Wednesday- Students should be able to finish their ribbon pots. I will assist students who need help making and adding handles. Students can also add relief or use sgraffito to decorate their pots as well. Thursday- I will introduce their next project, salt and pepper shakers. Students should come up with a theme and then complete a sketch for approval. Friday- After sketches are approved, students will be able to start working on their salt and pepper shakers. They will need to be in the round and hollow and fit the corks. October 7th-11th
Monday- I will introduce students to their next project, ribbon pots. They may begin sketching once they are ready. Some students still need to glaze their relief tiles. Tuesday-Once sketches are approved, students will begin their ribbon pots. They should start with a slab, circular base and roll long ribbons to build the walls. Wednesday- Students will continue to build their ribbon pots. They should be blending as they go and making sure their pot is even and symmetrical. Thursday- Early Release schedule Students will continue to work on their ribbon pots until they are about 10 inches tall. Friday- Students should be finishing up their ribbons pots. They should make sure they are blended well before putting them in the kiln room to begin drying out.
| ||||

9/16-9/20
Monday- Students will continue to work on their bas relief tile.
Tuesday- Students will continue to work on their bas relief tile. Students need to make sure they have at least 3 layers of relief.
Wednesday- Students should finish their bas relief tile by adding texture.
Thursday- We will have a critique of our slab boxes. Students will fill out a self-assessment before they turn it in. I will introduce the next project, Luminaries. I will also demo how to build using ribbons. Students will have a choice between between building their luminary/luminaries using slabs or ribbons. They can build 3 smaller luminaries, 2 medium, 1 large luminary. They will need to sketch before they can begin.
Friday- Students will use the slab or ribbon method to build their luminary/luminaries.
9/9-9/13
Monday- We are behind schedule from last week so I will be introducing bas relief tiles today. Students will sketch to scale and once I approve their sketch, they can begin rolling their slabs.
Tuesday- After their slabs have hardened, they can transfer their sketch onto their tile. Students can then begin to use subtractive and additive techniques to create low relief.
Wednesday- We will start class off with a class critique of the coil pots. Students will then fill out a self-assessment and turn their coil pots in to be graded. Students will continue to work on their bas relief tiles by adding clay where needed. Students should have at least three different "levels" of clay built up.
Thursday- Students should complete their tiles by adding texture where needed and smoothing and cleaning up edges.
Friday- Students should glaze their slab containers.
9/2-9/6
Monday- Enjoy Labor Day with family and friends!
Tuesday-We are a little behind from last week so students will need today to finish their slab plates. They should create decoration using underglaze.
Wednesday- I will introduce students to their next slab project, bas relief tiles. bas_relief_tile.pptx
I will do a demo and students will sketch. After their sketches are approved, students will be able to roll a slab and for their tile.
Thursday- After their slabs have hardened, they can transfer their sketch onto their tile. Students can then begin to use subtractive and additive techniques to create low relief.
Friday- Students will continue to work on their bas relief tiles by adding clay where needed. Students should have at least three different "levels" of clay built up.
8/26-8/30
Monday- Students will continue to work on their slab containers with a lid.
Tuesday-Students will complete their slab containers and begin to let them dry out. They can then glaze their coil pots.
Wednesday- I will introduce our next slab project, slump plates. I will demo how to roll thin slabs and drape the over a slump mold. Students will then make their own. While the plates are stiffening, they will create their own stencil for a design on their plate.
Thursday-Students will begin to use their stencils to paint their designs on their plates.
Friday- Students will finish plates and put them in the kiln room to begin drying out. They can then clear glaze their sgraffito tiles.
8/19-8/23
Monday- Many students did not get to begin their sgraffito tiles. They will begin these today.
Tuesday-Students will complete their sgraffito tiles. They need to create a 50/50 split of black and white. Students should break up space with patterns or textures.
Wednesday- I will introduce students to the next slab project, slab boxes. After my presentation and demo. Students will sketch their plan for their slab container with a lid. Once their slab is checked and approved, they may begin rolling slabs.
Thursday- Students will finish rolling slabs for their containers. Once they have rolled and cut all of their slabs, they will let them harden to leather hard. They can then begin putting the slabs together.
Friday- Students will continue to adhere their slabs to create their slab container. They will enclose the box and then cut the lid off.
What are we doing this week? 8/12-8/16
Monday- We will continue to work on our coil pots until they are at least 8" tall.
Tuesday- We will continue to work on out coil pots until they are at least 8" tall.
Wednesday- Students who are done with their coil pots need to move it to the kiln room to begin drying out. They can then glaze their pinch pots and then paint their whistles.
Thursday- I will introduce the next mini project, sgraffito tiles. I will demonstrate how to roll a tile and use sgraffito. Students will then roll their tile and sketch the design for their tile.
Friday- Students will begin scratching into their sgraffito tile.
What are we doing this week? 8/5-8/9
Monday-I will demo how to create a clay whistle using two pinch pots. Students will then create their own whistle with a functioning mouth piece.
Tuesday- Students will finish their whistle by creatively turning it into an animal/object of their choice
Wednesday- I will introduce students to their first big project, exposed coil pots. I will demo how to build coils and form them into different shapes as well as how to build with coils. Students will then sketch a design for their pot that must be approved before they can begin their pot. Click here to see the Power Point.coil_pot_with_variety.ppt
Thursday- Students will continue to work on their coil pot. They should use a variety of coils to build their walls and make sure to blend well as they build.
Friday-Students will continue to work on their coil pots. They will need to make sure they cover it up well before the weekend.
